
If you’re lucky enough to find yourself working with one of my custom coded MailChimp templates, this article is for you. It’s a nice little reference for some common procedures. Nothing fancy, just the facts. Happy editing!
The following tutorials are available:
- Adding / removing content sections
- Changing the order of content sections
- Hiding elements
- Inserting images (old style)
- Inserting images (new style)
- About image dimensions
- Inserting new links
- Editing existing links
- Working with configurable classes
- Inserting line breaks on desktop only
- Dealing with MailChimp quirks
Adding / removing content sections
When hovering your mouse over the bottom of a content section, this menu will appear:
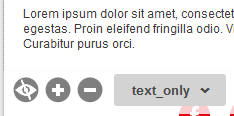
The options are (LTR):
- Hide content section.
- Add content section.
- Remove content section.
- A dropdown for selecting a different layout.
The difference between “hiding” and “removing” is that a hidden section can be reinstated, whereas a section that is removed, is gone forever.
To add a new section, simply click the plus icon. MailChimp will then proceed to add a new section at the bottom of your campaign. If you want to insert a new section between two existing sections, simply drag the section from the bottom to any position you like (see “Changing the order of content sections” below).
To change the layout of a section, you need to select an option from the dropdown. In the template used for this tutorial, the dropdown menu looks like this:
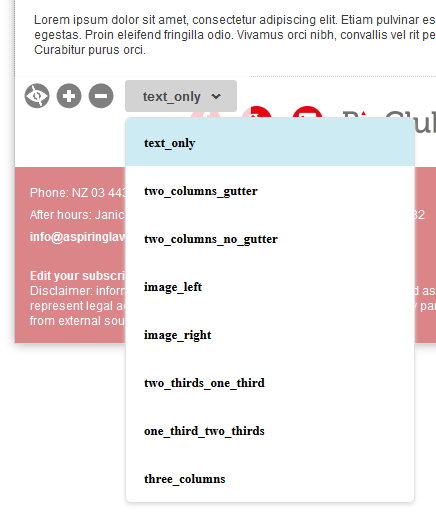
That means we have a whole bunch of options to choose from. The only thing that’s important here, is this: after you’ve selected one of these options, MailChimp will change the layout of the section at the bottom of which the menu appeared.
In other words: you can’t add a new section by simply selecting an option from the dropdown and then expect MailChimp to add that section underneath the current one. The correct procedure for adding a new section is: click the plus icon first, scroll down to the bottom of the new section (by default, MailChimp will insert a section with the first layout option it can find) and THEN select the layout you need.
Changing the order of content sections
Content sections have drag handles that appear in the top left corner, like so:
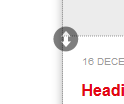
These drag handles allow you to…well…drag around content sections, so you can change their order of appearance. Simply click and hold, drag, wait for the “Drop block here” message to show up – and release. Ain’t nothing to it.
Sometimes you don’t need “all that”. If that’s the case, chances are I’ve made sure certain elements are hideable. Look for this icon:
Click the icon once to hide the element. Click it again to bring it back.
Please note: “hiding” an element will cause MailChimp to grey it out in the campaign builder. If you want to make sure it’s actually gone, check the preview (top right corner of your screen: “Preview and Test”).
These are the steps for inserting / editing an image in a dedicated image section:
- Click on the placeholder in the campaign builder (in the center of the screen).
- Write down (or remember) the recommended dimensions as specified in the placeholder.
- Double click on the placeholder in the editor (on the right hand side of the screen).
- (Optional) Close the “Insert or Edit Link” dialog that sometimes shows up.
- Click on “Back to files”.
- Select the image you want to insert (possibly upload it first), making sure the width (more or less) matches that of the “Image File Dimensions” in the placeholder.
- Change the width of the image to the width specified in the “Display Dimensions” in the placeholder.
- (Optional) Insert the URL you need the image to link to and either check or uncheck the “Open in a new window” box.
- Click “Save & Insert Image”.
- Click “Save & Close”.
You need to follow these steps carefully. If you don’t, chances are you’re going to mess up the responsiveness of your template. If that happens, these are the steps to repair your email:
- Add a new content section with the same layout.
- Click on the placeholder in that section.
- Go to the editor and go into “Source” mode by clicking on the <> icon.
- Whether you understand HTML or not, just copy everything in the editor and then close it.
- Open the section with the image that you inserted incorrectly.
- Go into “Source” mode, remove everything in sight and then paste in the code you just copied from the other section.
- Close “Source” mode by clicking the <> icon again.
- And that’s it, you’re now ready to reinsert your image.
These are the steps for inserting / editing an image in a dedicated image section:
- Write down (or remember) the recommended dimensions as specified in the placeholder.
- Click on the placeholder.
- Click on “Replace”.
- Select the image you want to insert (possibly upload it first), making sure the width (more or less) matches that of the “Image File Dimensions” in the placeholder.
- Go to “Settings” and change the width of the image to the width specified in the “Display Dimensions” in the placeholder. The height should be adjusted automatically when you place the cursor in the “Height” input field.
- (Optional) Insert the URL you need the image to link to (you’ll find this under “Content”) .
- Click “Save & Close”.
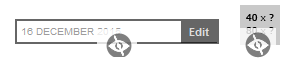
Placeholders contain two bits of information: “Display Dimensions” and “Image File Dimensions”. Since the height is set to “Any Height”, this is basically all about width. So what this means is that you need to insert an image that is twice as wide as you would like it to be displayed. That’s because retina displays (as found on iPhones and iPads) require more pixels to maintain image sharpness.
For example: if your image needs to be 290px wide in your email, you would upload an image that’s 580px wide. In the “width” box you would specify the intended width (i.e. 290px). The height will be adjusted automatically (as long as the checkbox “Keep proportions” is ticked). Check out this screenshot:

Now there are two more things to consider:
- The “x2 rule” isn’t carved in stone. It’s perfectly OK to insert an image 600px wide and then tell MailChimp to display it at a width of 290px. Just don’t go overboard on this: too few pixels and your image won’t look good on retina screens, or too many pixels and your images will load (very) slowly.
- For images narrower than 200px, the minimum image file width is 400px. This is because most images (social media icons are a common exception) are resized to the full width of the screen on mobile devices. And again, this requires more pixels.
To insert a new link, follow these steps:
- Select the link text.
- Click the “Style” dropdown in the editor menu.
- Select “Hyperlink”.
- Click the link icon in the editor menu.
- Insert the link URL.
- In the “Advanced Options” section, enter “hl” under “Class”. (Or “hd_hl” for headings.)
- Click “Insert”.
The order of these steps is important: get it wrong, and your link will look awful. To restore, select the link text, remove the link and click “Remove formatting”. Or just remove the link altogether. And then try again.
This is how to edit an existing link:
- Place the cursor in the middle of the link text.
- Type the new link text.
- Remove the old link text at the beginning and the end.
- Click the link icon in the editor menu.
- Edit the link URL.
- Click “Insert”.
Working with configurable classes
Most templates I deliver, contain a couple of configurable classes. You’ve already read about one of them: the “Hyperlink” class. These classes serve one purpose, and one purpose only: provide simple and consistent styling options. Using classes makes changing the color of your links a lot easier. If you style all of your links manually and then decide you want your links to be green instead of red, you’ll have to edit them one by one. Oh…the horror!
Configuring these classes is simple. Just make sure you close any editable elements you may be working on, and look at the sidebar. Your configurable classes are listed under “Design”. Simply click one of the (groups of) classes to see which options are available. Style to taste, and save your settings.
Now in order to apply one of the classes, all you have to do is highlight a word (or words) in the text editor and select a class from the “Style” dropdown in the editor menu.
Please note: even though most of my templates contain a dedicated “Hyperlink” class, any class can be applied to hyperlinks. Just remember to apply the class BEFORE you insert the hyperlink URL.
Inserting line breaks on desktop only
Let’s say we’re dealing with a two or three column content section and you want the buttons to sit at the exact same height, but the length of text above the button varies between columns. You could simply insert some line breaks to push one of the buttons down, but that would mean you’re left with useless white space on mobile. The solution: insert line breaks that are hidden on mobile here’s how:
- Open the text section you want to edit by clicking on it.
- Go into source mode by clicking the “<>” icon in the editor menu.
- Go to the end of the content and type: <span class=”hide_on_mobile”><br /><br /></span>
- (Two “<br />”s are the equivalent of one line of white space. Insert more “<br />”s if you need more lines.)
- Exit source mode by clicking the “<>” icon again.
- Click “Save & Close”.
- Check the preview (both deskop and mobile) to see if it works!
It could happen to any of us: you launch a wildly popular email platform, rocking millions of users worldwide and then your campaign builder starts acting up. Well, I’m here to tell you that MailChimp is no exception. These are some of the quirks I’ve run into over the years:
- Hiding element X accidentally hides element Y. Or vice versa. Or other hide & seek voodoo.
- Dragging content sections doesn’t work. Or it seems to work, but secretly doesn’t.
- You can’t reach the bottom of your campaign. Just…can’t…no matter how badly your scroll wheel wants it.
When any of the above seems to be happening, the remedy is easy as pie: close the campaign builder and reopen it. One way to do this, is to go to “Confirm” (in the navigation at the bottom of the page) and then go back to “Design”. Or, you could go to “Recipients” and then back to “Design”.
Or just shut down your computer altogether, have a cup (or glass) of your favorite brew, and then fire that bad boy back up. I think you get the point: you need to reload the editor. Once you’ve done this, things should be back to normal.


